
LotusDY Installation Instructions


TipaTech LotusDY
Eco-Friendly Under-Sink
Water Purifier


Contents
Introduction #3
Specifications #3
Kit Contents #4
Accessories #4
Unpacking #5
Important Notes #5-6
Installation #7-13
Installation Flow Diagram #14
Maintain & Replace #15-17
Troubleshooting #18-20
Contents
Introduction #3 Important Notes #5-6
Specifications #3 Installation #7-13
Kit Contents #4 Installation Flow Diagram #14
Accessories #4 Maintain & Replace #15-17
Unpacking #5 Troubleshooting #18-20
Introduction
Congratulations on your purchase of the TipaTech LotusDY!
TipaTech brings you the best Eco-Friendly Under-Sink Water Filtration System.
Starting today you revolutionize in your kitchen with LotusDY water purifier, a top solution for safer, sustainable drinking water, offering a highly efficient, healthy, economical, and eco-friendly option.
!!It is TOP PRIORITY to register your product and activate the warranty!!
!!warranty QR code either on the box, the product or find the warranty form at!! !!www.TipaTech.com!!
Specifications
Water source: Municipal water / chlorinated and approved for drinking by the regulatory authorities
Operating Conditions: Temperature: 41°F to 122°F (5°C to 50°C), Ambient Humidity: Below 90%
Filter Body Dimensions: Height: 14.76″ (37.5cm), Diameter: 5.90″ (15cm)
Complete Device Dimensions: Height: 17.71″ (45cm), Diameter: 5.90″ (15cm)
Device Weight (without water): 6.17lb (2.8kg)
Package Weight (device + accessories): 11.02lb (5kg)
Water Capacity Weight: 5.95lb (2.7kg)
Total Weight (device + water): 12.12lb (5.5kg)
Purified Water Flow Rate: 0.45 gallons (1.7 liters)/minute
Average Lifespan: Up to 1,056.68 gallons (up to 4,000 liters)
Operating Pressure: 21.75-58.01psi (1.5-4bar)
Kit Contents
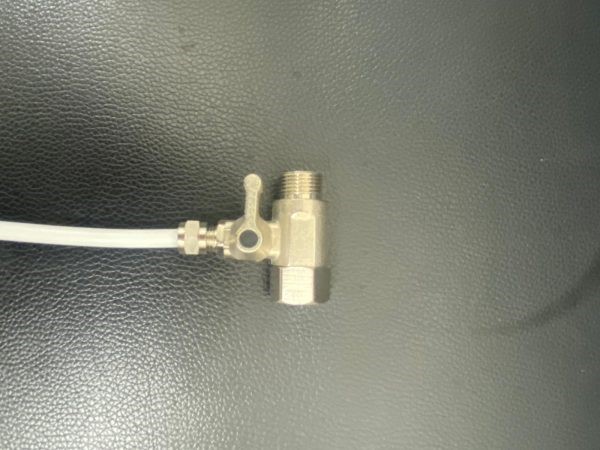
– Main Shut-Off Valve (1)
– Pressure Reducer (2)
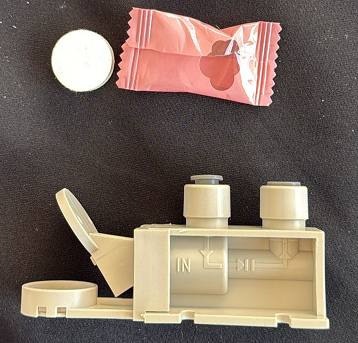
– Flood-Stop Safety Valve (3)
– Filter Head (5)
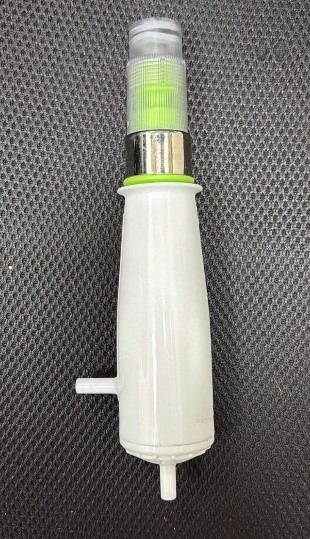
– LotusDY Filter (6)
– Lotus Post Filter (8)
– Hydro-Nator (HRW) Generator (10)
– Air-Release & Gas Trapper (11)
– Dispensing Handle (13)
– Premium Stainless-Steel Dispensing Faucet (14)
Accessories
– Angle Quick Connector ¼” * 5/16” (4) – 4pcs
– Straight Quick Connector / Screw (f/m) ¼” * ¼” (7 and 9) – 2pcs
– Straight Quick Connector (f/f) ¼” * ¼” (12)
– ¼” Tubing – 6.56 ft. – 1pc
– Teflon Tape – 1pc
– Hydro-Nator Mounting Clip – 1pc
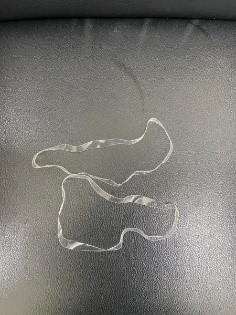
– Silicone bands – 2pcs
– Round Sponge – 2pcs
Unpacking
- Carefully open the box
- Verify all parts are included
- Inspect components for damage
***Please read these instructions carefully and follow each step to ensure proper installation of the system***
Important Notes
Please follow these safety guidelines:
*This system should be installed by authorized and qualified personnel only.
*Maintenance and service should be performed exclusively by authorized and qualified
technicians.
*Prior to installation, please verify that all components are present and undamaged.
*Before screwing any parts into these threaded openings, properly warp layers of Teflon tape
to ensure a proper seal. If a part has already been installed, unscrew it gently, apply the
Teflon tape, and then reassemble.
*If using a wrench is needed, tighten gently to avoid damaging or cracking any components.
*Keep the system out of reach of children. Children must not operate the system without adult
supervision.
*In the event of a malfunction, immediately close the water inlet valve. Do not leave the system
running if an error is detected.
*Water production output is influenced by inlet water quality, pressure, and temperature.
Suboptimal conditions may result in reduced flow rate.
*The pressure reducer supplied with the system is designed to reduce pressure to 58.01psi or
below. Exceeding this working pressure may bypass the pressure reducer and cause damage to
the system. In such a case, the system warranty will be void.
*Under no circumstances should the polish filter be closed or sealed on both ends after use.
*If leaving the house for two days or more, ensure to shut off the Main Shut-Off Valve feeding
the system.
Attention!
Installation Site Conditions:
*Choose an installation site that is clean, dry, and well-ventilated.
*Avoid placing the system in areas exposed to:
– Direct sunlight
– High humidity
– Flammable materials or explosives
– Unstable or unsafe electrical equipment
* Do not disassemble the system. Doing so may cause leaks or permanent damage.
* Operate the system only within the recommended temperature range of 41°F to 122°F
* Use only original accessories and components supplied by the manufacturer.
* Repairs maintenance and assistance must be performed exclusively by qualified professionals.
Caution!
Before drilling into any surface, confirm that there are no concealed water pipes, gas lines, or electrical
cables to avoid risk of damage or injury.
Installation Instructions
- Turn off the cold-water supply and disconnect the inlet water line.
- Install the Main Shut-Off Valve (1).
Before threading the component, wrap it with at least 15 layers of Teflon tape to avoid leaking.
- Connect the ¼” tubing to the Main Shut-Off Valve.
Leave the tubing length according to the installation layout.
Pressure Reducer
4. Cut the tubing straight and connect it to the Pressure Reducer (2) using its Quick Connector (f/f) ¼”. Double-click the tube into the connector to attach them securely.
Ensure the reducer is installed according to the flow-direction arrows marked on the body.
5. Connect the tubing to the Quick Connector (f/f) ¼” outlet of the Pressure Reducer by double clicking until fully secured.
Flood-Stop Safety Valve
6. Cut the tubing straight (make sure to leave it long enough so it will reach the bottom) and connect it to the inlet Flood-Stop Safety Valve using its quick connector (f/f) ¼”. Double-click the tube into the connector to attach them securely.
7. Connect the tubing to the Flood-Stop Safety Valve’s quick connector (f/f) ¼” outlet by double clicking until fully secured.
Ensure the tubes are installed according to the flow-direction arrows marked on the stopper body.
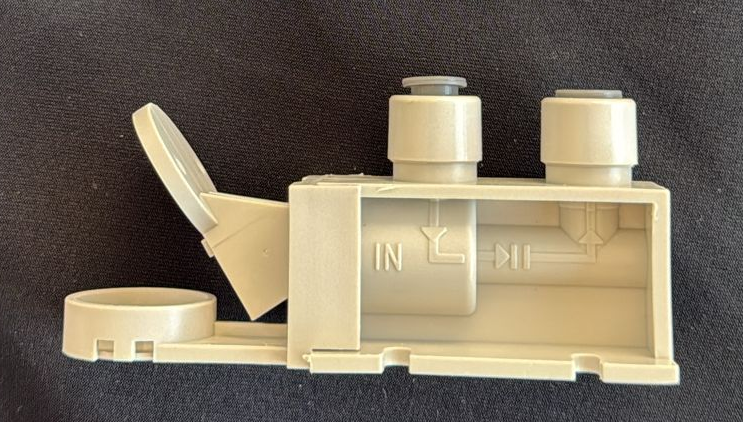
👉 Flood-Stop Safety Valve – How It Works
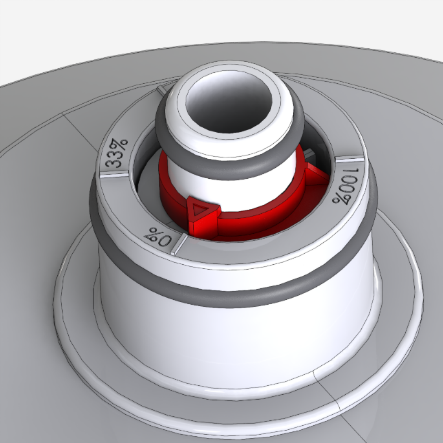
Magnesium Calibration Button
8. Make sure the Magnesium Calibration Button on top the LotusDY Filter (6) is set between 20% to 33% (the regulator is pre-set by the manufacturer according to your region).
9. Place the Filter Head (5) on top of the LotusDY, press it down gently and twist it half way to the right. Make sure its properly sealed.
10. Connect the tubing coming out of the Flood-Stop Safety Valve to the Angle Connector ¼” * 5/16” (4) that attached to the inlet of the Filter Head by double clicking until fully secured. Ensure the connector is fully into place and it is properly seated, ensuring no gap remains.
👉 How to Install the Connectors on the LotusDY Filter Head
11. Connect the tubing to the Angle Connector ¼” * 5/16” (4) that attached to the outlet of the Filter Head by double clicking until fully secured. Ensure the connector is fully into place and it is properly seated, ensuring no gap remains.
👉 How to Prevent Leaks When Quick Connector Is Used
Premium Stainless-Steel Faucet
12. Choose an existing hole in the countertop for the Premium Stainless-Steel Dispensing Faucet (14). If none is available, drill a ½” hole.
13. Insert the faucet, ensuring a rubber gasket is placed over the hole, followed by a stainless-steel plate to secure the seal.
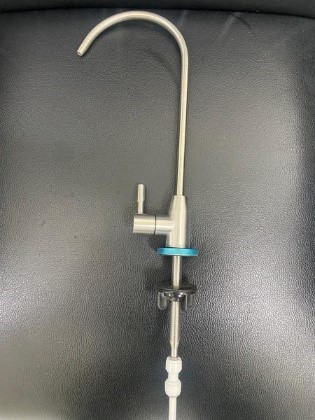
14. Tighten the faucet securely under the sink and attach the Straight Quick Connector (f/f) ¼” * ¼” (12) to the threaded end of the faucet.
Now it’s time to flush the LotusDY Filter
15. Connect the tubing coming out of the outlet Angle Connector ¼” * 5/16” (4) on the filter head to the Straight Quick Connector (f/f) ¼” * ¼” (12) connected to the faucet under the sink by double clicking until fully secured.
16. Open the Dispensing Handle (13) and leave the water running for at least 45 minutes to flush the LotusDY Filter until the water comes out totally clear. This step will prevent clogging the Lotus Post Filter.
17. Turn off the cold-water supply.
18. Disconnect the tubing from the Straight Quick Connector connected to the faucet under the sink by pushing in the ring located on the connector head and pulling the tube out.
Lotus Post Filter
19. Wrap the threaded side of the Straight Quick Connector / Screw (f*m) ¼” * ¼” (7) including the O-ring and all the way to the end of the threads with 15 layers of Teflon tape to prevent leaks and ensure a proper seal.
👉 How to Properly Screw and Connect a Quick Connector
20. Screw the connector (use a wrench to gently tighten the fittings only if needed) into the inlet of the Lotus Post Filter (8) head following to the flow-direction arrows marked on the filter body.
21. Cut the tubing straight (make sure to leave enough tubing for the remainder of the installation) and connect it to the quick-connect side of the Straight Quick Connector / Screw by double clicking until fully secured.
22. Warp the threaded side of the Angle Quick Connector / Screw (f/m) ¼” * ¼” (9) including the O-ring and all the way to the end of the threads with 15 layers of Teflon tape to prevent leaks and ensure a proper seal.
23. Screw the connector (use a wrench to gently tighten the fittings if needed) into the outlet of the Lotus Post Filter.
Note: If any leak appears after turning back on the cold-water supply, unscrew the fittings gently from
the Lotus Post Filter, apply more Teflon tape and reassemble.
Note: Ensure there is sufficient slack on both sides of the Lotus Post Filter tubing to prevent stress
on the plastic tubing and connectors. The tubing must not be bent, twisted, or kinked, as this may
cause pressure buildup, damage the tubing, or lead to cracking.
Hydro-Nator (HRW) Generator
24. Assemble manually the Air-Release & Gas Trapper (11) on top of the Hydro-Nator Generator (10).
25. Connect an Angle Quick Connector ¼” * 5/16” (4) to the Hydro-Nator inlet located on its side. Push the connector fully into place until it is properly seated, ensuring no gap remains.
26. Connect another Angle Quick Connector ¼” * 5/16” (4) to the Hydro-Nator outlet located on its bottom. Push the connector fully into place until it is properly seated, ensuring no gap remains.
27. Secure the Hydro-Nator Mounting Clip to one of the cabinet walls under the sink. The clip should support the Hydro-Nator from its lower section, below the connectors. Position it in an accessible location with sufficient tubing length is left to allow convenient access and easy replacement of the Gas Trapper in the future.
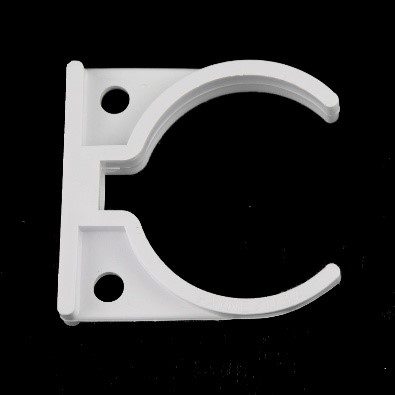
👉 Hydro-Nator Generator – How to Install the Mounting Clip
28. Cut the tubing straight while leaving sufficient tubing length between the Lotus Post Filter to the Hydro-Nator.
29. Connect the tubing from the outlet Angle Quick Connector (9) of the Lotus Post Filter to the Angle Quick Connector located on the side of the Hydro-Nator. Push the tubing in with a double-click until it is fully seated and securely locked.
30. Place the Hydro-Nator on its mounting clip.
31. Cut the tubing straight, leaving sufficient tubing length between the Hydro-Nator and the Straight Quick Connector (f/f) ¼” × ¼” (12) connected to the threaded end of the faucet under the sink.
32. Connect the tubing from the Angle Quick Connector outlet located on the bottom of the Hydro-Nator to the Straight Quick Connector connected to the threaded end of the faucet under the sink.
33. Turn on the cold-water supply and check there are not leaks from the fittings.
34. Use a measuring container to verify that the water flow rate does not exceed half a gallon (1.7 liters) per minute. If required, adjust the flow rate using the Main Shut-Off Valve installed in Section 1. Maintaining this flow rate ensures optimal filtration performance.
Now it’s time to flush the Lotus Post Filter
35. Open the Dispensing Handle (13) and leave the water running for 15 minutes to flush the Lotus Post Filter.
36. Once all system components are in place, secure the Flood-Stop Safety Valve (3) as close as possible to the LotusDY filter.
37. Open the round cover of the Flood-Stop Safety Valve (3), insert the round sponge to its designate place and close it back. Keep the extra sponge in case replacement is needed in the future.
Important Note:
In some cases, during the initial dispensing from the LotusDY system, air may be released from the dispensing faucet before water begins to flow. This is completely normal and is part of the system’s natural operation. The condition will resolve on its own, and the system will stabilize naturally after a short period of regular use.
If you wish to speed up this process, you may perform the following procedure:
In some cases, during the initial use of the LotusDY system, air may be released from the faucet. This can be prevented by following these steps:
1. Close the main shut-off valve located under the sink.
2. Open the faucet handle.
3. Hold the Hydro-Nator in your hand.(So that it remains higher than the LotusDY system)
4. Open the air release.
5. Tilt the Hydro-Nator to the side and empty the trapped water content
6. Quickly close the air release back on the Hydro-Nator to prevent air from entering the system again.
7. Reattach the Hydro-Nator to its mounting clip.
8. Close the faucet handle.
9. Open the main shut-off valve located under the sink and run water through the faucet again for an additional 5 seconds.
Once this procedure is complete, the system can be used normally, with no air pockets in the water line.
***Even if this procedure is not performed, or if air is still released when opening the dispensing faucet, the air discharge will stop on its own after a short period of normal use, and the system will stabilize naturally.***
Recommendation:
To save space in the cabinet under the sink, you may gently attach the Lotus Post Filter to the LotusDY Filter body using the transparent silicone bands included in the kit.
Caution: Make sure not to bend or kink the tubes, as this may create pressure buildup or cause them to crack.
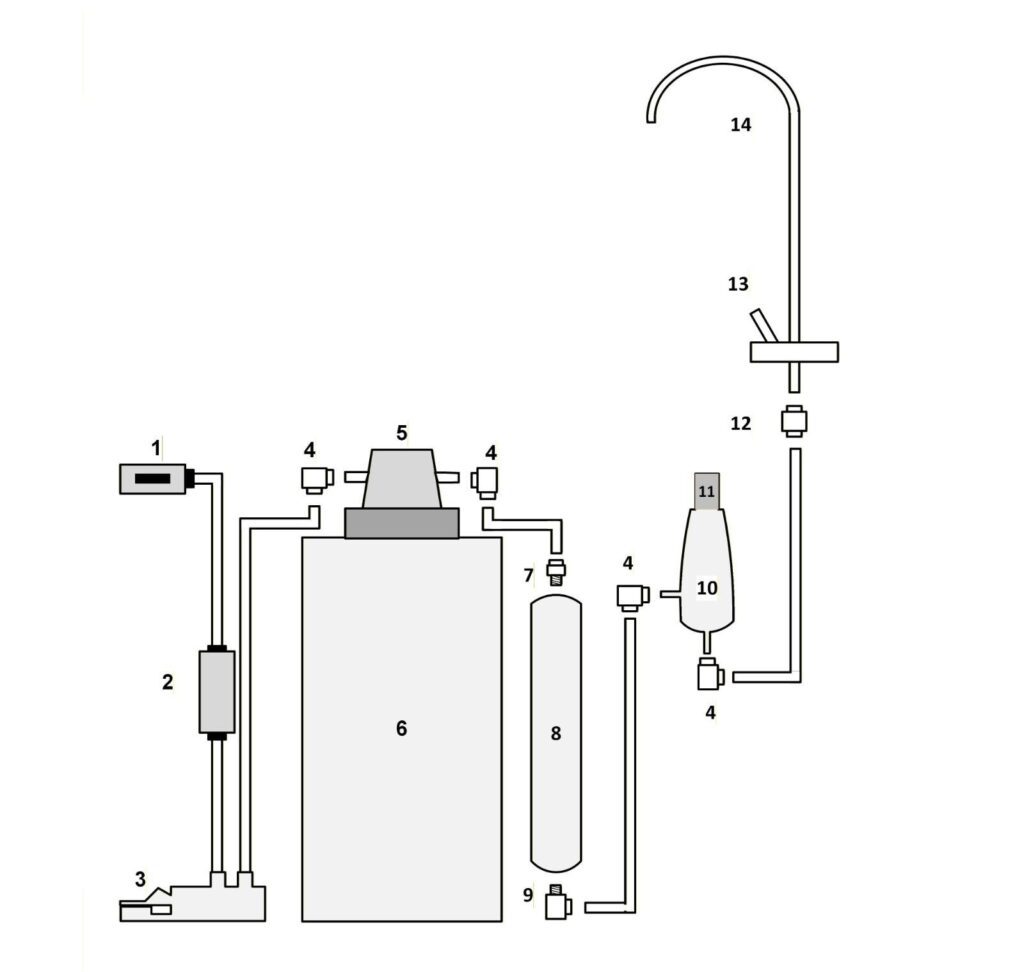
LotusDY Installation – Flow Diagram
TAP Priority – Regular Maintenance Guide
To keep your filtration system running at its best, follow these simple maintenance steps:
A. Cartridge Replacement
Replace the LotusDY Filter cartridge every 1,050 gallons (4,000 liters), depending on local water quality, or once a year—whichever comes first.
B. Lotus Post Filter Replacement
Replace the filter the Lotus Post Filter every 1,050 gallons (4,000 liters), depending on local water quality, or once a year—whichever comes first.
C. Gas Trapper Replacement
The Gas Trapper should be replaced once a year.
To do so, simply unscrew the old one and screw the new one into place on top of the Hydro-Nator. Do not use any tools.
Important Maintenance Guidelines
General
* Maintenance must be performed by qualified personnel in accordance with the manufacturer’s instructions.
* Once a year, inspect all connections and clean the equipment’s inlet tubing.
* Once a year, bend the tubing and check its elasticity. If the tubing feels dry or brittle, replace it
immediately to prevent bursting and unintended activation of the Flood-Stop Safety Valve.
Filter Replacement
* It is essential to flush the system by allowing water to run through it before use. The flushing
procedure must be performed separately after replacing the LotusDY filter cartridge and again
after replacing the Lotus Post Filter to avoid clogging the system.
* The filter’s lifespan will vary based on water quality, usage time, seasonal conditions, mineral adjustment settings, and geographic area.
Machine Cleaning
* Do not use soap, detergent, or volatile cleaning agents such as thinners, gasoline, or alcohol. These substances can cause surface cracks or discoloration.
* Clean the outer surface of the machine using only water.
* Do not disassemble the system during cleaning.
How to Replace the LotusDY Cartridge
- Place paper towels or a cloth under the work area during replacement to absorb moisture and prevent accidental activation of the Flood-Stop Safety Valve.
- Turn off the cold-water supply connected to the system using the Main Shut-Off Valve (1).
- Open the Dispensing Handle (13) to release pressure from the system.
- Disconnect the Angle Connector ¼” * 5/16” (4) from the Filter Head (5) on its both sides by pushing in the ring located on the connector head and pulling it out.
- Gently press the Filter Head downward and rotate it counterclockwise to disconnect the used filter cartridge.
- Remove the protective cap from the new filter cartridge.
- Align the new filter cartridge with the filter head.
- Gently press the Filter Head downward and rotate it clockwise to connect the new filter cartridge. Ensure the filter head is fully closed and properly seated to prevent leaks.
- Reconnect both Angle Connectors ¼” × 5/16” (4) to the inlet and outlet of the Filter Head (5). Ensure the connectors are fully inserted and properly seated, with no gap remaining.
- Flush the cartridge by connecting it directly to the faucet. Disconnect the tubing connected to Straight Quick Connector (f/f) ¼” * ¼” (12) located at the bottom of the faucet under the sink by pushing in the ring located on the connector head and pulling the tube out.
- Disconnect the tubing connected to the Straight Quick Connector / Screw (f/m) ¼” * ¼” (7) and connect it directly to the Straight Quick Connector (f/f) ¼” * ¼” (12) located at the bottom of the faucet under the sink by double clicking until fully secured.
- Turn back on the cold-water supply connected to the system using the Main Shut-Off Valve (1).
- Open the Dispensing Handle (13) and allow water to run through the system for 45 minutes.
- Ensure the LotusDY Filter is properly installed in its position, seated securely adjacent to the Flood-Stop Safety Valve (3).
Now it’s time to replace the Lotus Post Filter
How to Replace the Lotus Post Filter
- Turn off the cold-water supply connected to the system using the Main Shut-Off Valve (1).
- Open the Dispensing Handle (13) to release pressure from the system.
- Disconnect the tubing connected to Straight Quick Connector (f/f) ¼” * ¼” (12) located at the bottom of the faucet under the sink by pushing in the ring located on the connector head and pulling the tube out.
- Unscrew both connectors (7 and 9) from the inlet and outlet of the used Lotus Post Filter and remove any remaining Teflon tape from the threads.
- Rewrap the threaded side of the Straight Quick Connector / Screw (f/m) ¼” * ¼” (7) with at least 15 layers of Teflon tape including the O-ring and all the way to the end of the threads to avoid leaking. Rewrap the threaded side of the Angle Quick Connector / Screw (f/m) ¼” * ¼” (9) as well.
- Screw both connectors to the inlet and outlet of the new Lotus Post Filter. Ensure following the flow-direction arrows marked on the filter body. If using a wrench is needed, tighten gently to avoid damaging or cracking.
- Reconnect the tubing coming from the Angle Connector ¼” * 5/16” (4) on the outlet of LotusDY Filter Head to the Straight Quick Connector / Screw (f/m) ¼” * ¼” (7) located on the inlet of the new Lotus Post Filter by double clicking until fully secured.
- Reconnect the tubing coming out of the Angle Quick Connector ¼” * 5/16” (4) located on the bottom of the Hydro-Nator Generator (10) to the Straight Quick Connector (f/f) ¼” * ¼” (12) located at the bottom of the faucet under the sink by double clicking until fully secured.
- Turn back on the cold-water supply connected to the system using the Main Shut-Off Valve (1).
- Open the Dispensing Handle (13) and allow water to run through the system for 15 minutes.
- Use a measuring container to verify that the water flow rate does not exceed half a gallon (1.7 liters) per minute. If required, adjust the flow rate using the Main Shut-Off Valve (1).
Maintaining this flow rate ensures optimal filtration performance.
- The system is now ready for use.
Troubleshooting
Chlorine taste or odor appears in the waterThe inlet and outlet connections have been installed in reverseVerify and correct the direction of water flow. Ensure the inlet and outlet ports are properly connected according to the installation diagram
| MALFUNCTION | POSSIBLE CAUSES | SOLUTIONS |
| Very little or no water flow | The tube is bent | Straighten or reposition the tubing |
| The water inlet Main Shut-Off Valve is closed | Open the water inlet Main Shut-Off Valve | |
| The main water supply is turned off | Wait for the main water supply to resume | |
| Water pressure is too low | Install a pressure-boosting device if needed | |
| Feed water temperature is below the required level | Increase the feed water temperature to the specified level | |
| Flood-Stop Safety Valve stopped the water flow | Turn off the Main Shut-Off Valve. Find and fix the leaking source. Dry the filter surrounding. Close the Flood-Stop Safety Valve and turn back on the Main Shut-Off Valve to ensure there is no leaking. Insert a new round sponge to its designate place and close it back | |
| The LotusDY requires additional flushing time to fully stabilize the system | Close the water supply using the Main Shut-Off Valve (1). Disconnect the Lotus post filter(8) from both sides of the tubing using the quick connectors (there is no need to remove it from its threaded connection). Turn the Lotus post filter upside down and reconnect it in the opposite direction of the water flow. Reopen the Main Shut-Off Valve , open the dispensing faucet, and flush the system for at least 30 minutes until the water runs completely clear. | |
| Abnormal water taste | The system has not been used for an extended period | Run water through the system for at least 5 minutes before use |
| Poor incoming water quality | Replace the filter cartridge | |
| The filter cartridge is overdue for replacement | Replace the filter cartridge | |
| Too low or too fast feed water flow rate | Increase the feed water flow rate as per system specifications | |
| Chlorine taste or odor appears in the water | The inlet and outlet connections have been installed in reverse | Verify and correct the direction of water flow. Ensure the inlet and outlet ports are properly connected according to the installation diagram |
Air coming out from the Dispensing Faucet |
Air in the Hydro-Nator | In some cases, during the initial use of the LotusDY system, air may be released from the faucet. This can be prevented by following these steps: 1. Close the main shut-off valve located under the sink. 2. Open the faucet handle. 3. Hold the Hydro-Nator in your hand.(So that it remains higher than the LotusDY system) 4. Open the air release. 5. Tilt the Hydro-Nator to the side and empty the trapped water content . Quickly close the air release back on the Hydro-Nator to prevent air from entering the system again. 7. Reattach the Hydro-Nator to its mounting clip. 8. Close the faucet handle. 9. Open the main shut-off valve located under the sink and run water through the faucet again for an additional 5 seconds.
Even if this procedure is not performed, air release from the dispensing faucet will stop on its own after a short period of use, and the system will stabilize naturally.
|
| Improperly installed fitting or gasket | Turn off the Main Shut-Off Valve. Disconnect the fittings at the leak source. If it is a threaded connection, apply several wraps of Teflon tape around the threads and carefully re-tighten the connection. If it is a quick connector, ensure the tubing is cut straight, fully inserted, and that no gap remains. | |
| Faulty fitting or gasket | Contact technical support for inspection and replacement of the faulty part. | |
| White water (Hydrogen water) | Nano-Bubbles appear in the water | This is a normal and healthy process. The bubbles will disappear within a few seconds after the water is dispensed. |
| Leak under the Air-Release | The O-ring is not seated properly | Remove the Air-Release by unscrewing it, properly reposition the O-ring gasket inside it, and then reassemble the Air-Release. |
The LotusDY Under-Sink Water Purifier
have been
Tested and Certified by

By following this guide, you ensure a smooth installation process, optimal performance, and the highest water quality from your LotusDY Water Filtration System.